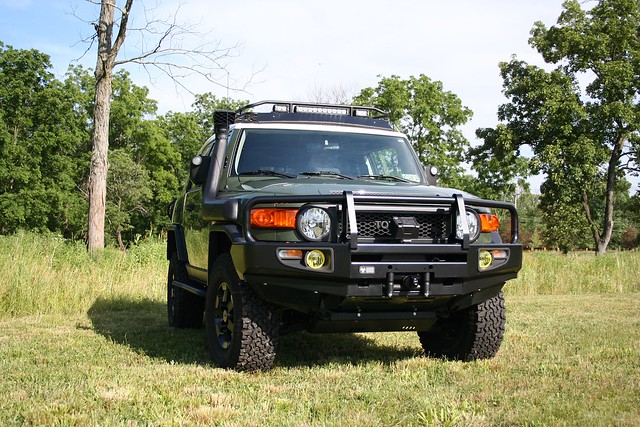
Don’t get me wrong, the FJ that I drove away from the showroom was a great vehicle. Killer good looks, trim and fit, with both agility and brawn (rather like its owner, if I do say so myself, although others may have a different opinion on the “trim and fit” part). I bought a fully loaded 2012 FJ, with locking rear diff and A-TRAC, as well as all the upgrade packages they could squeeze in. However, what I really wanted was the mythical FJ Cruiser “Overland Edition.” My only other option was a Trail Teams Edition FJ. The Trail Teams FJs are nice, but where’s the winch to pull me out the muck when I’ve exercised questionable judgment on trail? Where’s the second battery system to run an obnoxiously large 12v refrigerator for my Yuengling lagers? Where’s the sturdy bumper so that I don’t have to slow down for all the deer I see driving home from work each evening? No, the Trail Teams just would not do the job. I decided I needed to create the FJ that Toyota should have offered to my particular mid-life-crisis demographic.
My decision to create an “Overland Edition” FJ happened to coincide with the start of a new season of The Walking Dead. Watching the show, I frequently thought, “Boy, they sure could really use a sturdier vehicle, which would make running down zombies considerably more safe, and also allow them to flee across the nearest rock strewn field when the previously living get too thick.” Thus, my “Overland Edition” FJ quickly morphed into a “Zombie Evasion Edition” FJ, which in my mind was almost exactly the same, but even more fun. With the overall approach locked down, I began the planning phase.
The intent was to build an FJ that I could still use as a daily driver without being gawked at when walking into work (well, at least not too much…), but which was still highly functional and reliable in an overland/expedition mode of use. In essence, something that could get me back and forth to work and be reasonably behaved in doing so, but that could also get me, my lovely wife and two little girls out of dodge right quick if the dead do happen to begin rising from their eternal resting places. I also wanted it to look and feel as much like a Toyota-designed and created version of the FJ as possible, i.e., not an “in your face,” over-the-top, look-at-my-big-lights-and-big-tires rig (my success in the latter goal is debatable).
This thinking drove a number of key decisions. First, everything would be as “low profile” as possible while still fulfilling its essential function in a robust way. Second, no loud colors or stickers; those wouldn’t be on Trail Teams, and therefore could not be on this FJ either. Third, lifted, yes, but just enough to enhance the FJ’s already very capable set up. Fourth, wheels and tires that don’t scream “my #$%@ is bigger than yours!”
To my wife’s horror, my first upgrade was to gut the rear of the FJ, including the rear door, to install a double dose of Dynamat. I had noticed significant exhaust and road noise from the rear of the FJ during my first two months of driving it, and figured it would only get worse with more aggressive tires. The Dynamat reduced the noise and vibration considerably, so it was well worth the effort.
I then moved on to the suspension, I opted for a 2” Old Man Emu lift (heavy) front and back. The heavy version was selected in anticipation of front and rear bumper upgrades, in addition to the other weight-adding mods. I also wanted to add as much cargo hauling capacity as possible. The OME lift consisted of heavy springs front and rear, couple with Nitro Charger Sport struts/shocks. In the front, I also added Total Chaos upper control arms and upgraded spindle gussets. In the rear I upgraded to General Armor lower control arms. Holy cow are those things beefy. With this suspension set up, I figure I’ve added considerably to the ability of the rig in terms of performance, robustness, and load carrying ability.
I should pause here to note that when I use phrases like “I added” and “I installed,” I of course mean that the expensive and questionable modification described was “installed by JT, a highly skilled and meticulous technician at OK4WD in Stewartsville, New Jersey, and his detail oriented and customer friendly service manager Steve.” All kidding aside, the guys at OK4WD did almost all the heavy lifting here, including installation of the new suspension, bumpers, roof rack, lighting, and electrical upgrades, and they did a solid job of it.
Making use of all those suspension upgrades are BF Goodrich All Terrain T/A KO LT285/75R16 tires and Toyota TRD Wheels. Remember that I had made the silly decision to have the rig look like it came right from Toyota? That short sighted decision resulted in a frustrating series of interactions with my Toyota dealership and Toyota itself. I was intent on purchasing those cool, anthracite grey TRD alloy wheels that ship on the Trail Teams Edition FJ, thinking this would not only meet my “low profile” objective, but also my “designed and sold by Toyota” objective. So, I naively called the dealership where I purchased the FJ and placed a parts order for six TRD-special-edition-super-cool-grey-wheels. They accepted my order and assured me they would have them in a week or so. Well, seven weeks and a number of polite, but increasing frustrating, calls later, they in fact had obtained exactly one out of six wheels. Then, if you can believe it, Toyota called them and made them ship that one back to the warehouse!
It turns out that Toyota had implemented a policy of not selling those super-duper-cool-grey-TRD-wheels to anyone unless they have a VIN number from a Trail Teams FJ. Well, not to be deterred in my quest to build my ultimate mid-life crisis FJ just the way I wanted it, I changed my order to the silver version of that same wheel, which Toyota was more than happy to sell to me. Exhibiting what my wife has occasionally, and charitably, characterized as “a bit stubborn” way, I took those beautiful brandy new wheels to the powder coaters and had them stripped bare and re-painted just the right color. For all that hassle, they came out flawless and beautiful, and dare I say, even better than the special edition wheels I had originally wanted (take that you supply chain control freaks!).
Just in case those big tires run a little low on pressure, or in case I need to inflate a dinghy to flee across a lake or river from an approaching throng of the living dead, I added an ARB on-board air compressor, which is nestled perfectly in the engine compartment just behind the passenger side headlight. The compressor is switched on and off using a custom “Super Secret Spy Mode” switch in the center console (I had to include some elements to keep my daughters interested).
To the front of the FJ, I added an ARB bull bar, which, after reading the multiple stories of head-on collisions with deer on the FJ Cruiser forums, was the clear winner of the available after-market bumpers. Also, the ARB bumper is reasonably “low key” compared to many of the other available options. Installed in the bumper are amber PIAA fog lights and a Warn 9.5xp winch with a Spydura line, which results in a considerable weight savings over the traditional steel line. I then added an ARB rear bumper, which was released just in time for this build, as the previous version wasn’t certified for use with late model FJ’s.
To the rear I also added Manik rear taillight guards. It was quite a task tracking those down, given that they haven’t been made for several years now, but I much preferred their look to the versions offered by current vendors. Thank you E-Bay.
In terms of side and undercarriage protection, I went BudBuilt all the way. I added a full set of skid plates underneath, including one for the rear differential. I also opted for Bud’s bump-out sliders with full tread plates.
In keeping with my “low profile” approach, I opted for a Gobi Stealth roof rack. Paul at Gobi worked with me to modify the rack to fit my selected lighting. I opted for VisionX EVO Prime single stack LED lights all round. Facing forward is a 17”, 8,600 lumen unit with a 20 degree beam, flanked by two 5”, 1,720 lumen units, each with a 40 degree beam. This lighting set up necessitated moving the front support bars on the Gobi rack a bit. This gives me more than 12,000 lumens facing forward, excluding the PIAA fog lights in the front bumper and the FJ’s standard headlights. Facing rearward are two more of the 5”, 40 degree units. For the rear facing rack lights, Paul came up with a great idea, which was to create a dropped cradle for each light. The result is that you can lay long flat cargo (like plywood to secure your windows in the zombie apocalypse, assuming Home Depot is still open and not overrun with walking puss bags at the time) without having it rest on the lights themselves. To access the roof rack, I also picked up a Gobi ladder for the rear door.
Thinking that fleeing the zombie hordes may occasionally necessitate fording moderately deep bodies of water, streets flooded by knocked over fire hydrants, and the like, it seemed prudent to add a snorkel. I managed to lay my hands on one of the first three ARB Safari Snorkels to hit US shores once the new version for late model FJs was released earlier this year. I may add the “scuba mod” at some point to ensure that I can wallow in ponds from time to time if needed.
The only other exterior modifications were blacking out the front grill, mirrors, and door handles, with PlastiDip, which seems to be holding up well so far. The PlastiDip finish matches the snorkel, roof rack, and rear taillight guards nicely, giving the coordinated “from the factory” look I was going for.
Interior upgrades started with installing a Dirty Parts second battery kit with an Odyssey PC1500DT deep cycle battery, which is controlled by a custom Dirty Parts three-way switch located in a stock switch position to the left of the steering wheel. The battery system is coupled with an AutoMeter Phantom voltmeter, which is located just below the air vent on the passenger side, and which is switched on and off using a custom “Zombie Response Mode” switch in the center console. Larry at Dirty Parts provided essential guidance and suggestions for this portion of the project. At Larry’s suggestion, I included an S-POD/The Source set-up, coupled with an aluminum six-switch plate in the cabin with custom switch face plates made by Dirty Parts. The switches control the five lights on the roof rack, the PIAA fog lights, three additional 12v accessory outlets installed in the bottom rear of the center console, and two 12v accessory outlets installed in the rear cargo area above the stock A/C outlet. All the additional outlets are Toyota original parts to maintain the “from the factory” look throughout.
To round out my storage, I added a SpringTail Solutions FJ Straddle, which sits across the front console, and a SpringTail Solutions FJ Side Rack, which attaches to the flat area above the driver’s side rear wheel in the cargo area. The products provide MOLLE-like attachment points, to which I have mounted various Maxpedition products. The Maxpedition items are extremely rugged and are likely to stand up well to the rigors of the zombie apocalypse. Finally, Mario at Adventure Trailers built a custom rear storage unit. I opted for a one drawer design, with open storage spaces on each side sized to fit .50 cal ammo cans. This somehow felt “just right” given that the FJ is Army Green. Also, I needed a solution that allowed access to the stock A/C and custom 12v accessory outlets in the cargo area, and this approach worked nicely. In another nod to my girls, the storage unit includes two “super secret spy compartments,” which are accessible only when the rear seats are folded down. It’s still unclear to me how “Super Secret Spies” fit in with evading Zombies, but my oldest daughter, a rather precocious five and half year old, has assured me that they are, and that I’m a bit silly for not having realized that apparently obvious fact sooner.
To give the build a finished, “special edition” look, Joel Ellis at Ellis Precision created some custom “Zombie Evasion Edition” badges for me, as well as a custom shift knob. The designs were based on art work that Vince Peterson, Volhoo on FJ CruiserForums.com, created for me. These are the elements that really tie the build together, in my opinion.
To top things off, I ended up winning an ARB Simpson III tent in a raffle at OK4WD. Word has it that the walking dead don’t climb well, so we should be all right up there if we need to stop for the night. Besides, it seems like the tent would make an excellent platform from which to plink zombies at close range with a .22 pistol should we need to clear the camp site before starting on our eggs and bacon.
In the zombie apocalypse, mobility could turn out to be very important, and I think this set up will serve our little family well. And, even in the unfortunate event that there is no zombie apocalypse, I think I’m good to go for any remote camping or expedition-type outing I could possibly imagine.
Thus concludes Phase I of my “Zombie Evasion Edition FJ Cruiser.” Phase II will likely include an expansive communications and GPS package, a solar charging set-up to supplement the dual-battery system, a second gas tank from Man-a-Fre, a matching trailer from Adventure Trailers, IR illuminators for lights-out night driving with night vision goggles, and, perhaps, a slushy machine of some type. A budget has been created, reviewed, and submitted to management (read: “my lovely wife”), but approvals have not yet been received. A man can hope.
More Photos!
[flickr set=72157631101399576]
To get your copy of the July 2012 issue of FJC Magazine:

 I blame it all on my brother-in-law Dax. He just had to go and buy a black FJ back in 2007. Over the subsequent four plus years I have been subjected to a series of pictures showing his FJ in all sorts of thrilling, precarious-looking situations, not to mention pictures of camping and cavorting throughout the Texas countryside. This constant harassment (damn you FaceBook!) caused me to reminisce about the rough looking CJ-7 I owned back in college, with a suspension lift and knobby mud terrains, and about the Toyota SR5 truck I had before that, with a hideous body lift and tires that were way too big for the little four cylinder engine. Being an early 40’s, mid-career, married man with a wife and two young, boisterous daughters, I figured it was just about the right time for a quasi-mid-life crisis vehicle. Before long, I had traded in my well-mannered and perfectly practical Honda Pilot for a 2012 Army Green FJ Cruiser. It seemed the rational thing to do at the time. That was October 2011. Little did I know that I would spend the next eight months researching, planning, and ultimately building the FJ that I wished I could have bought directly from Toyota.


