Popular among soccer moms and dirt seeking trail riders, the 4Runner has had a steady and loyal following and in recent years has exploded into the most popular 4x4 SUV for building into an Instagram-worthy offroad powerhouse. It has always been reliable and built with tried-and-true Toyota technology and engineering.
We opted for a SR5 4x4 Premium to keep the cost down and didn’t feel the need for crawl control or a locker. This build is a daily driver, but also a fun, fire road, weekend warrior with aftermarket suspension, roof rack, larger tires, lighting and electronics. We’re keeping it simple but capable and keeping extra weight to a minimum. So, no metal bumpers or a rear-swing out. Here’s what we’ve done so far and what we have planned for the Trail Runner build:

Cargo
The first thing we did was remove the factory roof rack rails and install a proper roof rack for hauling gear. We contacted Bajaracks and discussed our needs and settled on the full length 4Runner model minus the mesh netting and hole for the sunroof. We wanted maximum surface area to mount gear if we needed it. Although we could have gone with the more common and popular 80/20 extruded aluminum versions like Prinsu or Rhino Rack, we like the bold look of a traditional round-bar rack without the need for any specialized mounts or accessories. We lash our cargo with a few ratchet straps and we’re on our way.
ROAM Adventures was kind enough to let us try a few of their Rugged Case solutions for our build. We were sent 3 boxes, one 95L case and two 82L cases. The plan is to use the 82L cases for kitchen and camp gear while the longer, flatter case for soft gear such as blankets, sleeping bags, pillows, hammocks and towels. The Rugged case provides notches for ratchet straps. A feature which I very much like, because there’s been too many times I’ve bent and cracked the plastic ridges on my Front Runner Wolf Packs while tightening a ratchet strap over them. The cases are also water and air tight with pressure valves for those times in high altitudes. ROAM also makes molle panels and pouches for the inside of the lid of some models that utilize otherwise wasted space. We’ll be roof mounting these cases and won’t have to worry about any dust or water intrusion on our adventures.
Suspension And Tires
The next order of business was to upgrade from the factory 265s to larger 285/70-R17 (33”) tires. We ordered a set of five new Falken Wildpeaks AT3s and had them installed at our local Discount Tire. The Wildpeaks have a proven track record among offroad enthusiasts and positive reviews indicate great tire wear, balancing and performance on and off trail. We’ve come to the same conclusion after a summer season of running around on forest roads in Idaho and driving to and from work.

Larger tires mean a bigger lift. We reached out to ICON Vehicle Dynamics to discuss our needs and decided on a Stage 2 package consisting of 2.5” front coilovers, upper control arms and rear 2” shocks and springs. This will give us about a 3” lift in the front and 2” in the rear. We’ve had a lot of experience with IVD suspensions in the past and run them on our FJ Cruiser without any issues for over 10 years now. Although not the lowest price suspension out there, we wanted to run them on the 4Runner because they performed well over the years on and off road. This is where we wanted to spend the money and not skimp on performance. It was the first time I had installed a suspension system and with a lot of help from youtube and ICON’s instructions it went fairly smooth. It just took time since it was my first time. Tip: Don’t remove the rear track bar. It’s not necessary in order to install the taller ICON springs in the rear. I removed it and had a hard time realigning the bolt holes. A little advice from my daughter (Yep, her idea) and I was able to park the 4Runner parallel to and on a slight inclined sidewalk and it moved the track bar a quarter of an inch, just enough to realign the bolt holes. That was really the hardest part and I had fun learning how to do it. After the suspension installation the 4Runner did develop a very slight clanking noise. It took a few weekends to narrow it down, but the noise got louder and I was able to determine that the driver side inner tie rod was failing. I have the parts from Toyota, but have not yet installed it at the time of writing this article.
Lighting
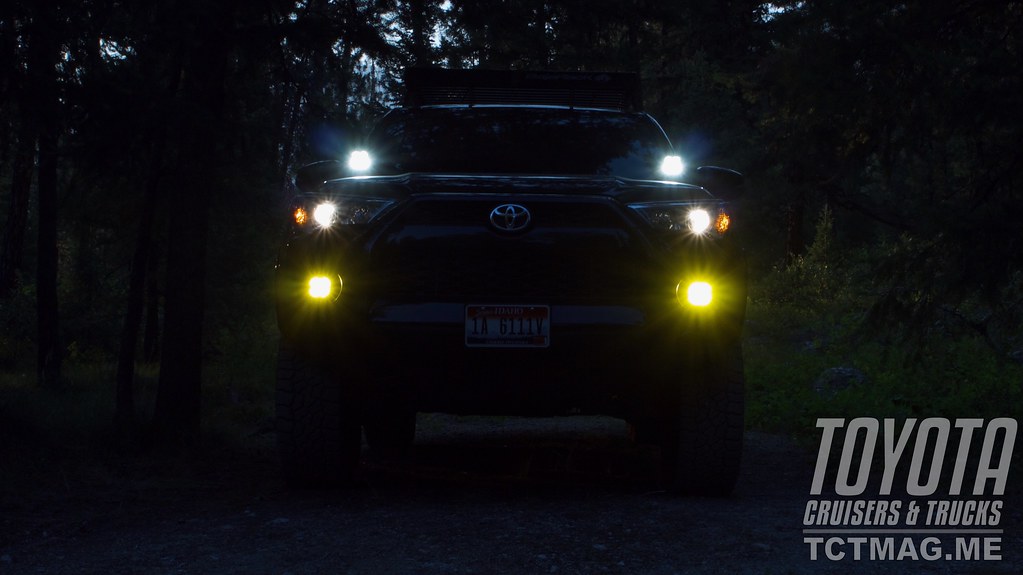
One of the most contentious and beloved topics of offroaders is lighting. Why do you need all those lights and for what? If you combined all our staff vehicles, we could probably light a small stadium. As the saying goes you can never have too many lights. As part of our Trail Runner lighting plan we reached out to and talked with Diode Dynamics to design and install a basic setup. It will throw beams of light down the trail, into the fog and to the sides of the road. The total package included their SS3 Pro LED Fog Light Kit to replace the factory fog lights, Stage Series SS3 Pro Ditch Light Kit and Stage Series 42” Light Bar. With all lights installed our pattern of beams would throw over 15k raw lumens down the trail with a driving/flood combo lens, 10k lumens on foggy days with a flood lens and 6k lumens into the side of the road with a driving/flood combo lens. With our previous experience I can’t stress enough on how much ditch lights have helped us to avoid obstacles on night runs through the forest or desert. It helped us spot large Elk just to the side of a dark two-lane road into Grand Canyon National Park. Without the ditch lights we were totally blind to their presence. Design your lighting plan with purpose and it will potentially save your life.

Power Management
After we install the newest SwitchPro 9100 power management system into our FJ Cruiser, we’ll be removing and installing the older 8100 unit into the Trail Runner. This will manage all the switches for the offroad lighting and future fridge. The installation will include the use of a specialized mounting tray in the engine bay so we can route all the wires in a neat and orderly method. I can’t stand wires running everywhere like a bowl of spaghetti. Our plan is to do without dual batteries, but we’ll be utilizing a solar generator (battery pack) for additional power for accessories while in the wild.
Other Considerations
I know I mentioned no rear swing out bumper earlier in this article, but I would not mind a removable hitch mounted solution for our larger 33” spare tire and the occasional use of a jerry can or Rotopax. It also has a place to mount our ActionTrax traction pads. I can easily remove and stow it away when not in use. There are several companies that have solutions like RIGD, Wilco and Dirtcom. Some also feature a fold down table for convenience and a trail side snack or beverage.
There are also various companies that fabricate interior molle-style panels for extra cargo carrying capacity that mount inside the 4Runner’s rear window. It’s an interesting idea and one that could come in handy for smaller items like first aid kit, fire extinguisher, molle pouches and flashlights. We want to take the Trail Runner out into the wild more before we determine if it’s necessary. There is also a solution in which the panel mounts to the outside of the 4Runner over the rear windows. I’m not sure if we need the post-apocalyptic Mad Max look just yet. There is definitely no shortage of 4Runner gear and accessories, because of its massive popularity.
We’ll be busy the next few months and into winter as we tool-around in the garage and get the Trail Runner into shape for next summer’s camping season. Follow along on our Instagram (@tctmagazine) to see updates to our Trail Runner build.
[flickr set=72157720082999661]
To get your copy of the
Summer 2021 Issue:
Follow us on Facebook, Twitter, and Instagram to get up-to-date industry news, events, and of course, amazing adventures, stories, and photos!


